
 Docker Compose 部署 Harbor
# Docker Compose 部署 Harbor
# 概述
Harbor 是一个用于存储和分发 Docker 镜像的企业级 Registry 服务器,通过添加一些企业必需的功能特性,例如安全、标识和管理等,扩展了开源 Docker Distribution。作为一个企业级私有 Registry 服务器,Harbor 提供了更好的性能和安全。提升用户使用 Registry 构建和运行环境传输镜像的效率。Harbor 支持安装在多个 Registry 节点的镜像资源复制,镜像全部保存在私有 Registry 中, 确保数据和知识产权在公司内部网络中管控。另外,Harbor 也提供了高级的安全特性,诸如用户管理,访问控制和活动审计等。
# Harbor 特性
基于角色的访问控制 : 用户与 Docker 镜像仓库通过 “项目” 进行组织管理,一个用户可以对多个镜像仓库在同一命名空间(project)里有不同的权限。
镜像复制 : 镜像可以在多个 Registry 实例中复制(同步)。尤其适合于负载均衡,高可用,混合云和多云的场景。
图形化用户界面 : 用户可以通过浏览器来浏览,检索当前 Docker 镜像仓库,管理项目和命名空间。
AD/LDAP 支持 : Harbor 可以集成企业内部已有的 AD/LDAP,用于鉴权认证管理。
审计管理 : 所有针对镜像仓库的操作都可以被记录追溯,用于审计管理。
国际化 : 已拥有英文、中文、德文、日文和俄文的本地化版本。更多的语言将会添加进来。
RESTful API : RESTful API 提供给管理员对于 Harbor 更多的操控,使得与其它管理软件集成变得更容易。
部署简单 : 提供在线和离线两种安装工具, 也可以安装到 vSphere 平台 (OVA 方式) 虚拟设备。
# Harbor 组件
Proxy: Harbor 的 registry, UI, token 等服务,通过一个前置的反向代理统一接收浏览器、Docker 客户端的请求,并将请求转发给后端不同的服务。
Registry: 负责储存 Docker 镜像,并处理 docker push/pull 命令。由于我们要对用户进行访问控制,即不同用户对 Docker image 有不同的读写权限,Registry 会指向一个 token 服务,强制用户的每次 docker pull/push 请求都要携带一个合法的 token, Registry 会通过公钥对 token 进行解密验证。
Core services: 这是 Harbor 的核心功能,主要提供以下服务:
- UI: 提供图形化界面,帮助用户管理 registry 上的镜像(image), 并对用户进行授权。
- WebHook: 为了及时获取 registry 上 image 状态变化的情况, 在 Registry 上配置 webhook,把状态变化传递给 UI 模块。
- Token: 负责根据用户权限给每个 docker push/pull 命令签发 token. Docker 客户端向 - Registry 服务发起的请求,如果不包含 token,会被重定向到这里,获得 token 后再重新向 Registry 进行请求。
Database: 为 core services 提供数据库服务,负责储存用户权限、审计日志、Docker image 分组信息等数据。
Job Services: 提供镜像远程复制功能,可以把本地镜像同步到其他 Harbor 实例中。
Log Collector: 为了帮助监控 Harbor 运行,负责收集其他组件的 log,供日后进行分析。

上图是1.x版本架构介绍,但是是比较基础的。最新的Harbor 2.x 架构概述图已经更新,有兴趣可以看Harbor架构概述 (opens new window):

# 安装Harbor
# 解压安装包
官方 GitHub (opens new window) 上下载最新离线安装版并上传至服务器。
docker@docker-saas:~$ tar -zxvf harbor-offline-installer-v2.3.1.tgz
harbor/harbor.v2.3.1.tar.gz
harbor/prepare
harbor/LICENSE
harbor/install.sh
harbor/common.sh
harbor/harbor.yml.tmpl
# 修改配置文件
docker@docker-saas:~$ cd harbor/
docker@docker-saas:~/harbor$ cp harbor.yml.tmpl  ./harbor.yml

docker@docker-saas:~/harbor$ sudo vi harbor.yml
# 修改为域名或你服务器 IP
hostname: 192.168.99.101
# 注释掉https协议,有相关证书不用注释。
# https related config
#https:
  # https port for harbor, default is 443
#  port: 443
  # The path of cert and key files for nginx
#  certificate: /your/certificate/path
#  private_key: /your/private/key/path
# 执行安装脚本
docker@docker-saas:~/harbor$ sudo ./install.sh

[Step 0]: checking if docker is installed ...

Note: docker version: 19.03.12

[Step 1]: checking docker-compose is installed ...

Note: docker-compose version: 1.29.0

[Step 2]: loading Harbor images ...
Loaded image: goharbor/harbor-exporter:v2.3.1
Loaded image: goharbor/notary-signer-photon:v2.3.1
Loaded image: goharbor/trivy-adapter-photon:v2.3.1
Loaded image: goharbor/harbor-portal:v2.3.1
Loaded image: goharbor/harbor-log:v2.3.1
Loaded image: goharbor/redis-photon:v2.3.1
Loaded image: goharbor/registry-photon:v2.3.1
Loaded image: goharbor/chartmuseum-photon:v2.3.1
Loaded image: goharbor/harbor-core:v2.3.1
Loaded image: goharbor/nginx-photon:v2.3.1
Loaded image: goharbor/harbor-jobservice:v2.3.1
Loaded image: goharbor/harbor-db:v2.3.1
Loaded image: goharbor/harbor-registryctl:v2.3.1
Loaded image: goharbor/notary-server-photon:v2.3.1
Loaded image: goharbor/prepare:v2.3.1


[Step 3]: preparing environment ...

[Step 4]: preparing harbor configs ...
prepare base dir is set to /mnt/sda1/docker/harbor
WARNING:root:WARNING: HTTP protocol is insecure. Harbor will deprecate http protocol in the future. Please make sure to upgrade to https
Clearing the configuration file: /config/registry/passwd
Clearing the configuration file: /config/registry/config.yml
Clearing the configuration file: /config/db/env
Clearing the configuration file: /config/portal/nginx.conf
Clearing the configuration file: /config/log/logrotate.conf
Clearing the configuration file: /config/log/rsyslog_docker.conf
Clearing the configuration file: /config/core/app.conf
Clearing the configuration file: /config/core/env
Clearing the configuration file: /config/nginx/nginx.conf
Clearing the configuration file: /config/jobservice/config.yml
Clearing the configuration file: /config/jobservice/env
Clearing the configuration file: /config/registryctl/config.yml
Clearing the configuration file: /config/registryctl/env
Generated configuration file: /config/portal/nginx.conf
Generated configuration file: /config/log/logrotate.conf
Generated configuration file: /config/log/rsyslog_docker.conf
Generated configuration file: /config/nginx/nginx.conf
Generated configuration file: /config/core/env
Generated configuration file: /config/core/app.conf
Generated configuration file: /config/registry/config.yml
Generated configuration file: /config/registryctl/env
Generated configuration file: /config/registryctl/config.yml
Generated configuration file: /config/db/env
Generated configuration file: /config/jobservice/env
Generated configuration file: /config/jobservice/config.yml
loaded secret from file: /data/secret/keys/secretkey
Generated configuration file: /compose_location/docker-compose.yml
Clean up the input dir


Note: stopping existing Harbor instance ...
Removing redis         ... done
Removing registry      ... done
Removing registryctl   ... done
Removing harbor-portal ... done
Removing harbor-db     ... done
Removing harbor-log    ... done
Removing network harbor_harbor


[Step 5]: starting Harbor ...
Creating network "harbor_harbor" with the default driver
Creating harbor-log ... done
Creating redis         ... done
Creating registryctl   ... done
Creating harbor-db     ... done
Creating harbor-portal ... done
Creating registry      ... done
Creating harbor-core   ... done
Creating harbor-jobservice ... done
Creating nginx             ... done
✔ ----Harbor has been installed and started successfully.----
安装脚本
# 登陆管理后台
通过浏览器访问 http://192.168.99.101/,看到登录页面,账号和密码:admin/Harbor12345。

# Harbor管理
# Harbor管理
Harbor 的日常运维管理是通过 docker-compose 来完成的。Harbor 本身有多个服务进程,都放在 docker 容器之中运行,我们可以通过 docker ps 命令查看。
docker@docker-saas:~$ docker ps | grep goharbor
CONTAINER ID        IMAGE                                COMMAND                  CREATED             STATUS                  PORTS                       NAMES
921b8b14ee46        goharbor/nginx-photon:v2.3.1         "nginx -g 'daemon of…"   17 hours ago        Up 17 hours (healthy)   0.0.0.0:80->8080/tcp        nginx
1339c12901cc        goharbor/harbor-jobservice:v2.3.1    "/harbor/entrypoint.…"   17 hours ago        Up 17 hours (healthy)                               harbor-jobservice
3e4b4441ce0b        goharbor/harbor-core:v2.3.1          "/harbor/entrypoint.…"   17 hours ago        Up 17 hours (healthy)                               harbor-core
1b6e8f6ffd58        goharbor/registry-photon:v2.3.1      "/home/harbor/entryp…"   17 hours ago        Up 17 hours (healthy)                               registry
b64418f3bb5b        goharbor/harbor-portal:v2.3.1        "nginx -g 'daemon of…"   17 hours ago        Up 17 hours (healthy)                               harbor-portal
ff3dfe5dec59        goharbor/harbor-registryctl:v2.3.1   "/home/harbor/start.…"   17 hours ago        Up 17 hours (healthy)                               registryctl
2e0878f63c64        goharbor/harbor-db:v2.3.1            "/docker-entrypoint.…"   17 hours ago        Up 17 hours (healthy)                               harbor-db
d3d4ecaa9017        goharbor/redis-photon:v2.3.1         "redis-server /etc/r…"   17 hours ago        Up 17 hours (healthy)                               redis
9ef3883f4092        goharbor/harbor-log:v2.3.1           "/bin/sh -c /usr/loc…"   17 hours ago        Up 17 hours (healthy)   127.0.0.1:1514->10514/tcp   harbor-log
要对Harbor管理,只需要进入到Harbor的安装目录,通过 docker-compose 来完成的,下面为常见命令:
# 启动
docker-compose start -d

# 停止
docker-comose stop

# 重启
docker-compose restart -d
# 相关镜像说明
Harbor相关镜像说明:
- nginx: nginx 负责流量转发和安全验证,对外提供的流量都是从 nginx 中转,所以开放 https 的 443 端口,它将流量分发到后端的 ui 和正在 docker 镜像存储的 docker registry。
- harbor-jobservice: harbor-jobservice 是 harbor 的 job 管理模块,job 在 harbor 里面主要是为了镜像仓库之前同步使用的;
- harbor-core: 主要由多个http服务组成,包含harbor-ui 、harbor-token等服务,主要的功能有:
- 监听Registry上镜像的变化,做相应处理,比如记录日志、发起复制等
- 充当Docker Authorization Service的角色,对镜像资源进行基于角色的鉴权
- 连接Database,提供存取projects、users、roles、replication policies和images元数据的API接口
- 提供UI界面
- registry: registry 就是 docker 原生的仓库,负责保存镜像。
- harbor-portal: 前端应用,对应的portal容器中有nginx服务,获取图标等信息。
- **harbor-registryctl:**docker distribution的控制组件,提供API以便触发垃圾回收动作
- harbor-db: harbor-db 是 harbor 的数据库,这里保存了系统的 job 以及项目、人员权限管理。由于本 harbor 的认证也是通过数据,在生产环节大多对接到企业的 ldap 中;
- redis: redis服务,用于registry缓存;
- harbor-log: harbor-log 是 harbor 的日志服务,统一管理 harbor 的日志。通过 inspect 可以看出容器统一将日志输出的 syslog。
这几个容器通过 Docker link 的形式连接在一起,这样,在容器之间可以通过容器名字互相访问。对终端用户而言,只需要暴露 proxy (即 Nginx)的服务端口。
# 容器对应的默认目录
| 容器名 | 物理路径 | 容器路径 |
|---|---|---|
| log | /var/log/harbor | /var/log/docker |
| registry数据目录 | /data/registry | /storage |
| registry配置目录 | ./common/config/registry | /etc/registry |
| mysql数据目録 | /data/database | /var/lib/mysql |
| mysql变量文件 | /common/config/db/env | |
| adminserver配置目录 | /data/config/ | /etc/adminserver/config/ |
| adminserver秘钥文件 | /data/secretkey | /etc/adminserver/key |
| adminserver数据目录 | /data/ | /data/ |
| UI配置文件 | ./common/config/ui/app.conf | /etc/ui/app.conf |
| UI私钥文件 | ./common/config/ui/private_key.pem | /etc/ui/private_key.pem |
| UI秘钥文件 | /data/secretkey | /etc/ui/key |
| UI | /data/ca_download/ | /etc/ui/ca/ |
| UI | /data/psc/ | /etc/ui/token/ |
| jobservice日志文件 | /data/job_logs | /var/log/jobs |
| jobservice配置文件 | ./common/config/jobservice/app.conf | /etc/jobservice/app.conf |
| jobservice秘钥文件 | /data/secretkey | /etc/jobservice/key |
| proxy配置文件 | ./common/config/nginx | /etc/nginx |
# Harbor镜像私服
# 配置仓库地址
在 /etc/docker/daemon.json 中增加如下内容(如果文件不存在请新建该文件)
{
  "registry-mirrors": [
    "https://registry.docker-cn.com"
  ],
  "insecure-registries": [
    "192.168.***.**:**"
  ]
}
重启服务
systemctl daemon-reload
systemctl restart docker
使用 docker info 命令手动检查,查看Insecure Registries是否生效。
# 上传镜像
我们以推送 Nginx 为例。
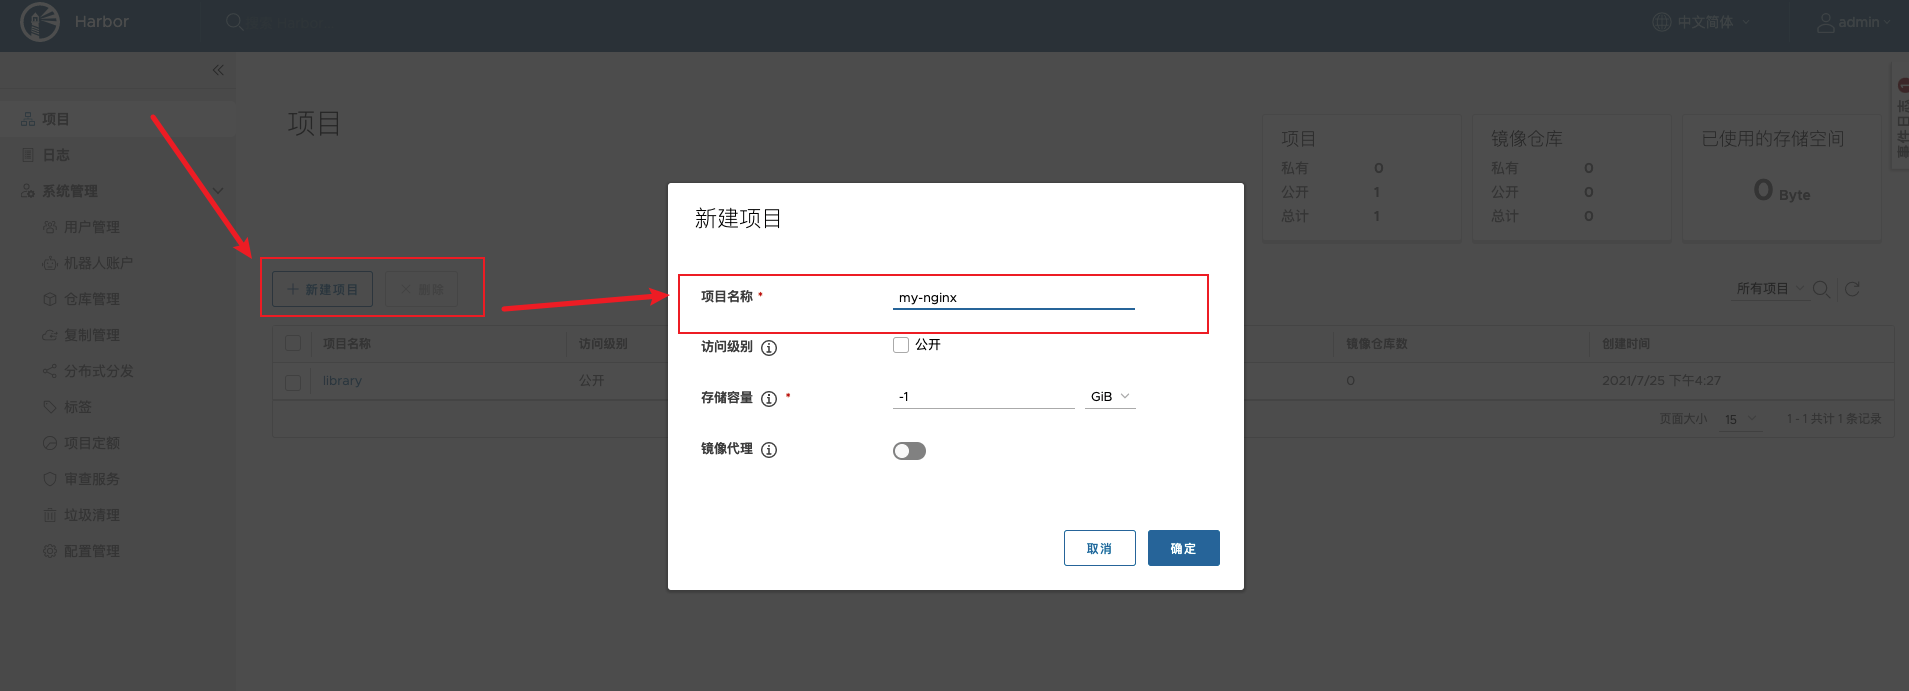
新建项目,首先需要在 Harbor 上创建一个 公开/私有 的项目,我命名为 my-nginx。
推送镜像,推送命令参考Harbor给的命令。
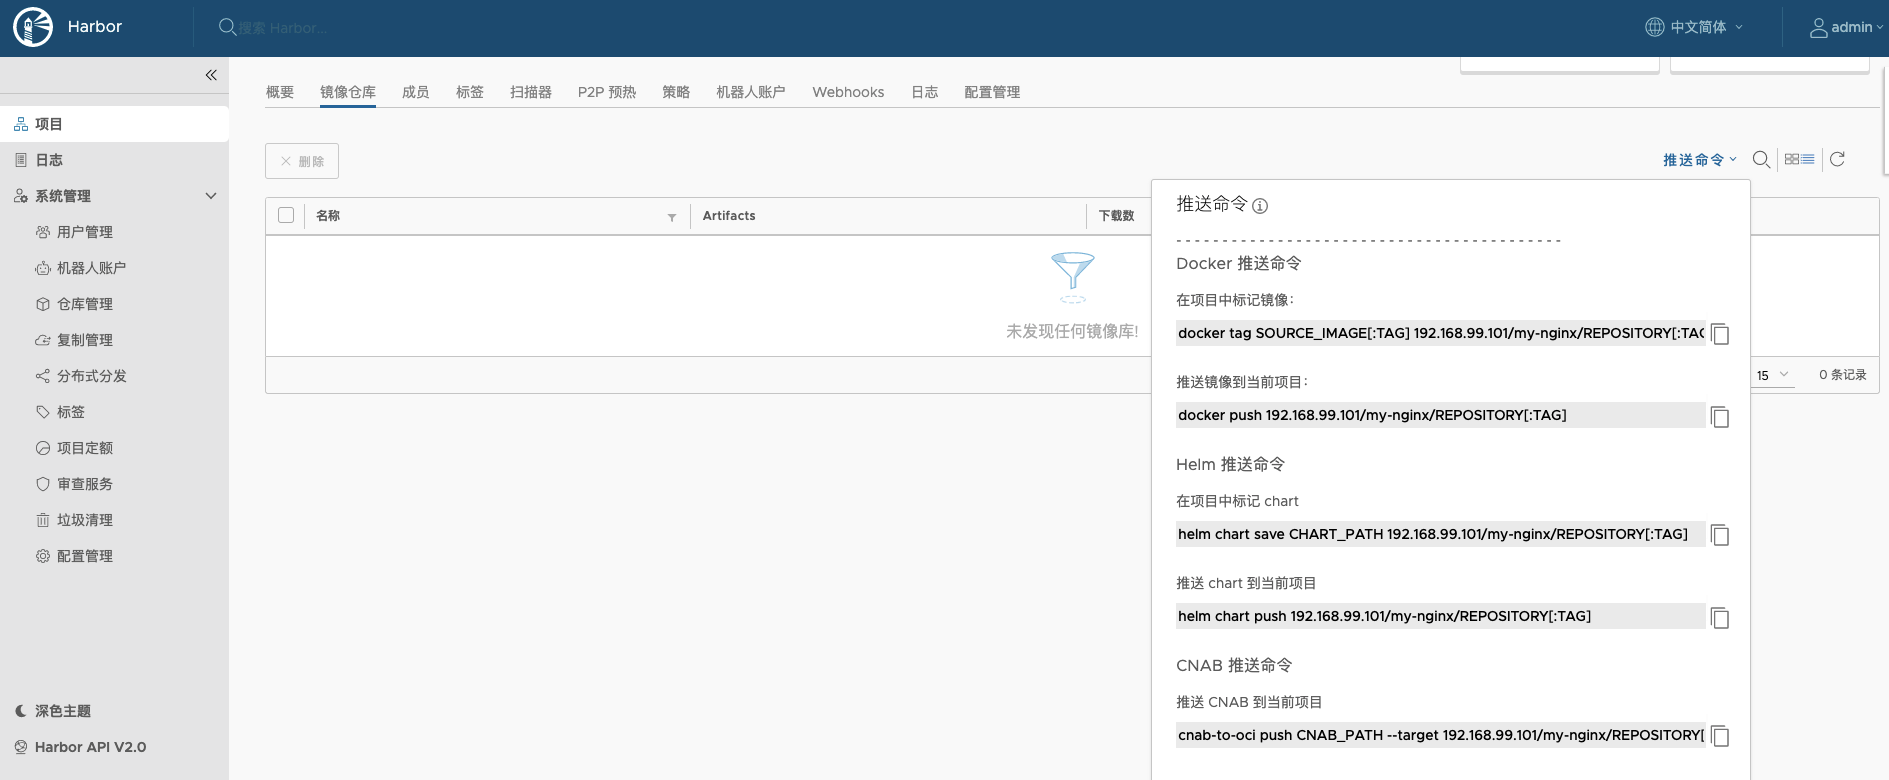
Harbor 给的 Docker 推送 参考命令:
# 在项目中标记镜像
docker tag SOURCE_IMAGE[:TAG] 192.168.99.101/my-nginx/REPOSITORY[:TAG]
# 推送镜像到当前项目
docker push 192.168.99.101/my-nginx/REPOSITORY[:TAG]
由于我新建的项目是私人的,需要登陆到Harbor才能推送:
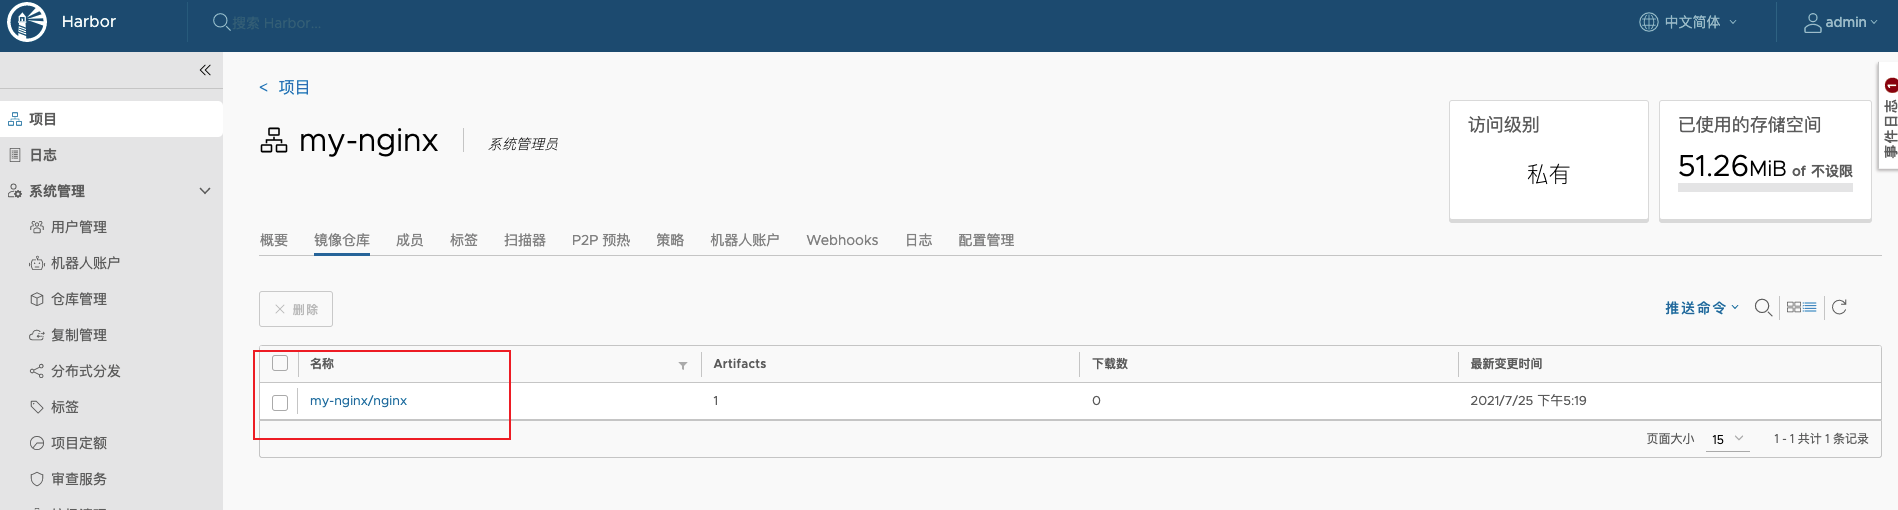
# 在项目中标记镜像
docker tag nginx 192.168.99.101/my-nginx/nginx:latest

# 登录 Harbor
docker login 192.168.99.101 -u admin -p Harbor12345

# 推送镜像到项目
docker push 192.168.99.101/my-nginx/nginx:latest
上传成功后,可以在Harbor的管理页面的my-nginx查看到上传到镜像。
# 下载镜像
如果其他机器需要下载镜像,只需要配置好客户端的镜像仓库地址即可。
同时在管理页面,查看每个镜像的详情可以获取到拉取镜像的命令,或者通过镜像名称和版本号拉取。
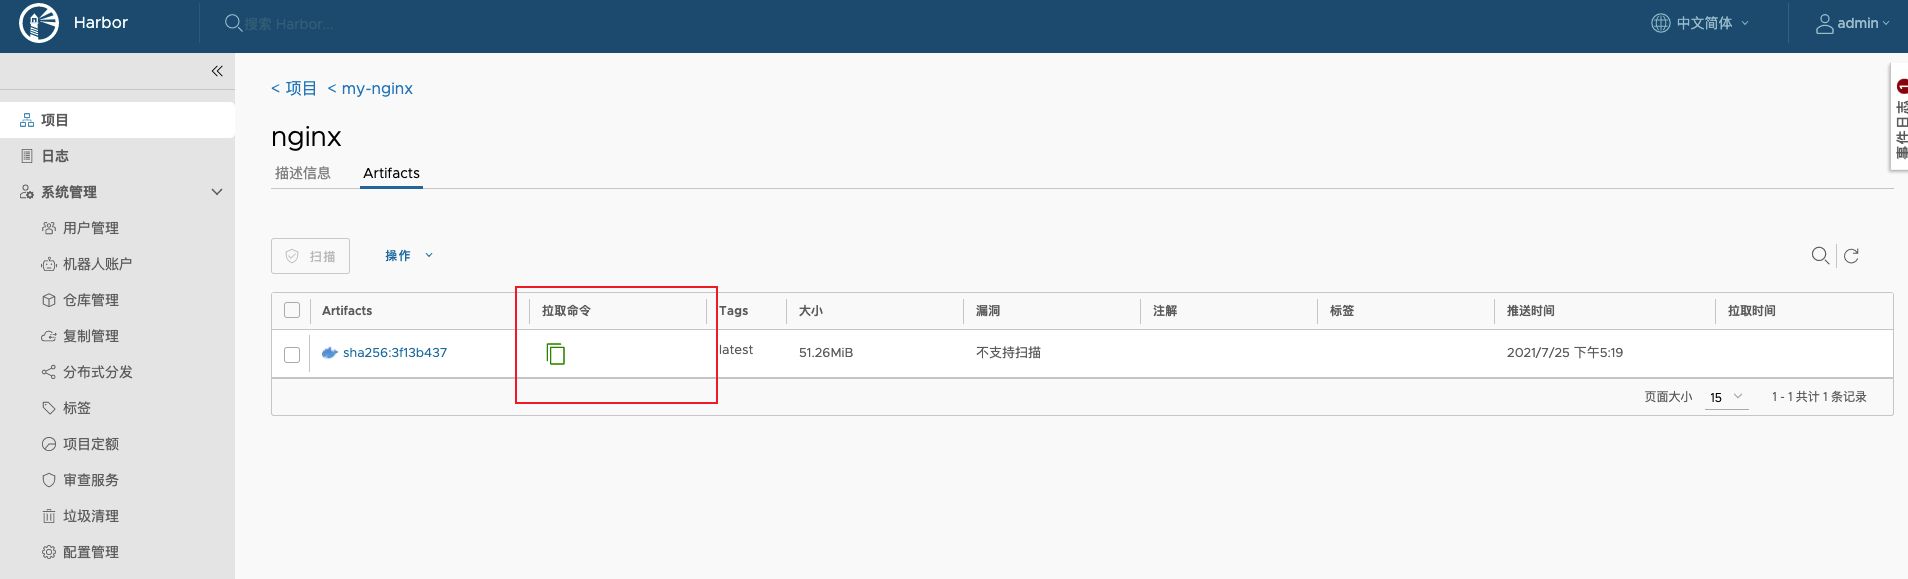
# 通过镜像名称和版本号拉取
docker pull 192.168.99.101/my-nginx/nginx:latest
# Harbor提供的拉取命令
docker pull 192.168.99.101/my-nginx/nginx@sha256:3f13b4376446cf92b0cb9a5c46ba75d57c41f627c4edb8b635fa47386ea29e20
# 参考
- Docker Compose部署Harbor (opens new window)
- harbor各组件功能介绍及龙芯适配工作 (opens new window)
- harbor的管理 (opens new window)